Artist's Prayer


Give us Your daily Inspiration
So, we can live a Creative Life.
And lead us away from self-doubt,
For to doubt our creativity
Is to doubt Your Voice within us.
Amen.

Wednesday, April 29, 2009

Glass, Paper, And TV Darama On PC

I begun to work on one of the bottles I bought yesterday. The smaller one felt to be a good warm up before the XXX-Large fun.... Last night I poured, intermittently, Golden Liquid Acrylics Sap Green, Iridescent Gold (Fine) and Interference Oxide Red, down the bottle neck. After I closed it with an old cork top, I gave it some shakin' & rollin'.... and let it dry overnight.

One of my very favorite techniques to experiment with has always been a torn-up paper pieces glued to a surface. It started back in my grammar school when our art teacher decided to teach us mosaic making by gluing together pieces of colored papers. I deeply enjoyed those projects and I've been waiting for an opportunity to finally experiment with this technique as an adult. And that's how my bottle' surface met with newspaper and collage paper tonight... mutually cemented by Golden Soft Gel Semi-Gloss. As an accompaniment I used last week's 'Grey's Anatomy' and 'Burn Notice' episodes played on my laptop while joining glass and paper in a rather unexpected union.... here's what my camera chronicled:


Tuesday, April 28, 2009

Frugal Finds For Your Creative Heart...

I stopped by my local Goodwill store this morning to see if I can find some creative inspiration for this week .... If you've never visited Goodwill, I encourage you to give it a try. $5 bill has 'extended buying' power there. I didn't discover the many blessings of Goodwill until about a year ago. First of all, every employee greets you with a warm smile and a genuine welcome and when making a purchase the cashier will thank you for supporting Goodwill's mission. Whenever you spend money or donate your own unwanted items you are helping, otherwise unemployable, men and women. Goodwill creates a workplace environment that teaches one to find a self-respect through service to others.

I came across two very unique glass containers, one is an old-looking bottle and the other is an elongated-shaped bottle-like.... dish? of some sorts, brings back some memories of organic chemistry nightmares with its peculiar spherical shapes.... see for yourself.


I may pour paint down the bottle.... glue bits and pieces of paper, ribbons, or just paint on its surface.... My total investment in these finds came to just above $5. I encourage you to take yourself for a stroll down the aisles of your local thrift store and see if you can find some creative sustenance in rummaging through old treasures...

Sunday, April 26, 2009

Do Not Ask What An Empty Wine Bottle Can Do For You...

Instead, ask what YOU can do WITH an old bottle... The question I have posed was ~ what if, what if I pour different liquid acrylics down the empty wine bottle? Then, later on, I thought to myself - what if I alter this cool bottle with paper and ribbons?

While watching-listening to the Chicago Bulls playoff game this afternoon I decided to indulge in some unexpected creative fun for couple of hours. I really like how the final version of the bottle turned out and I'm coming up with couple of different ideas for its future use. I think it could stand on its own as an altered art piece, but personally I like to find different ways to utilize art in my daily life. I believe that fine art, crafts, or whatever category we use to classify a particular work, carries within itself an inherent purpose of engaging its viewer, that purpose has been bestowed upon it by its creator, artist. It seems to me that there's an unconscious dialog we carry with an artist when we engage our attention in relating to an artwork.... and it truly is timeless. Profits of any auction house can attest to this assertion.

But let's get back to my wine bottle...


I used a plethora of Golden Liquid Acrylics, the majority consisting of multiple pours of Quinacridone Magenta and Interference Oxide Red, next followed by cobalt Turquoise, Titan Buff, Paynes Gray, Iridescent Bright Gold (Fine), and Iridescent Pearl (fine).

Let's start pouring! One by one, paint goes in, then some additional servings down the bottleneck... there's no rules here, just pour your heart and bottles down, down...
Paint mixing and rolling... be careful not to spill the paint out as I did, straight onto the LCD of my camera, what can I say. If you put the cork back in, you can play 'spin-a-bottle' and create some really cool paint patterns...

That's how my bottle handled a bit of spinning, though at its final stage the color has settled to become quiet uniform as I decided, against my better judgment, to pour few drops of Retarder on top of the paints down the neck... if you like the final effect, use that recipe. Personally I like the color variation better.

Next, I covered the bottom portion of the bottle with Golden Soft Gel Semi-Gloss as the adhesive of my choice.

I cut out a desired piece of hand-made paper and pressed it against the gel letting the texture to become a bit uneven in selected areas.

I repeated the above procedure at the top of the bottle's neck.

Using a make-up wedge-shaped sponge I applied Golden Liquid Acrylics Iridescent Gold (Fine) to the raised surfaces of the bottle.

I found a piece of scrapbooking paper depicting some handwriting and first I burned the torn out edges. Next, with a sponge I stained it with Iridescent Gold, trying to create variations in paint application.

Again, with some help from Soft Gel, I glued the above piece of paper on top of the previously attached paper cover.

I used glue gun to attache ribbon to all four edges of hand-made paper that I used in the earlier steps.

Ribbon attaching continues...

I formed a bow of the ribbon and glued in a manner that suggests that a ribbon is tied all around the perimeter of the bottle... and it's not.

I wrote 'Du Vin' in a stylized, antiquated manner using brown and black Fine Line Markers. While still wet, I wiped the surface with a damp sponge to smear the ink.... just a bit.

In the end I applied a coat of Golden Acrylics Varnish (Satin) to the paper covered areas.

Finished altered wine bottle.

Before & After wine bottles ~ side by side.

Saturday, April 25, 2009

Few More Words On Artwork Aging...And Paint Pouring

As I've said before, when altering an image, always use a copy, if possible. The sheet of paper I'm aging in the below photos is a printout of some original texts I had found online. Before applying any paint or medium to the printed surface, especially to the ones right off an ink jet or laser printer, I highly recommend that you'll spray the imagery with, at least, two coats of Archival Varnish, letting the layers dry in between applications. Archival Varnish is sold in spray can containers and you must work with it Outdoors Only! I use it in my garage and leave the door open for a thorough ventilation. As a product itself, archival varnish will create a protective coat-barrier for the ink, paint, or pastels' particles. That way, once you move to the altering process itself, there will be no color or ink bleeding.


Once the varnish dried, I proceeded to finally have some fun... This particular sheet will most likely find its final destination as a cover to a, not as yet identified, surface.... perhaps a glass one. In the meantime I've applied, altogether, four acrylic paint glazes and two layers of soft gel semi-gloss. Here's how it all started....


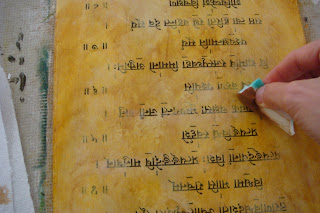
I applied a heavy glaze of Golden Liquid Acrylics Quiacridone Nickel Azo Gold.... I don't know how we were able to even approach altering art BEFORE this magnificent invention of QNAG?


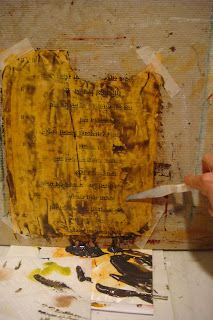
Undiluted, Liquid Titan Buff is applied to selected areas with a palette knife... this particular color is slightly translucent, so I decide to use it without glaze.


Using a damp paper towel I wiped off layers of paint, in some places going all the way to the varnish. Again, I'm comfortable to keep on wiping, knowing that the ink will stay protected thanks to the protection of the varnish...


Here, I worked with my palette knife while applying a somewhat heavy layer of Golden Soft Gel Semi-Gloss in order to Deliberately create ridges and uneven texture. Once dried, the surface is very smooth to the touch, yet holding gentle variations in texture which I like to use as 'anchors' for the future layers of paint glazes.

This step depicts a sporadic application of Golden Liquid Acrylics Brunt Umber Light utilizing a make up wedge-shaped sponge.


Another heavy layer of Golden Soft Gel Semi-Gloss... finally variations of layers, textures, and values are making their appearance.


Let me make another introduction at this point.... please meet Golden Liquid Acrylics Green Gold, applied in this step as a glaze that exudes a deeper patina... perhaps some old signs of mildew??? I know it sounds gross, but we're not here to ask questions.... our answers are to be found in the process of altered art making.


This part of the altering process may be a bit challenging, yet at the same time offer an abundance of visual and textural rewards. I mixed few ounces of Golden Clear Tar Gel in a plastic cup with a drop or two, literally of the following paints, all of them being Golden Liquid Acrylics: Quinacridone Burnt Orange, Transparent Red Iron Oxide, Brunt Umber Light, Sap Green, Carbon Black, and Interference Oxide Red. Next, I mixed it together with a wooden spatula in a cup and off I went to pouring the entire content of the container onto the surface. Let me give you a bit of clarification on this, seemingly ridiculous, number of single paint colors incorporated into the pour. I've said before and I'm upholding my spontaneity statement here again.... once I started adding and mixing the paint with tar gel and the mixture didn't not 'feel right' I kept on adding and mixing more products in. When it comes to your own altering process, PLEASE, trust your intuition, your inner voice, your imaginary friend, or however else you communicate and express your creative voice.... I'm only sharing my own journey here, hoping to inspire you to trust your inner muse and embark on your own journey.


Because the tar gel is not the easiest to manipulate with, I decided to ask gravity force for assistance... I stood the surface vertically and scraped off bits of product-paint mixture using my palette knife then left it to dry.


Creative credibility is always on the line when it comes to altered imagery and a convincing look that spells out 'antiquity'.... I love the challenge and always welcome it with my arms opened.

Wednesday, April 22, 2009

Aging Your Artwork...

A friend of mine was referring to his father's antique book collection, when he said, 'you know, it takes one hundred years for a book to become a hundred-years-old one.' That's certainly true of antiques, but as artist we can turn a brand new book into an antiquated gem by utilizing various techniques. And this subject matter become an inspiration for my new step-by-step article for Creativity Portal I begun to work on yesterday.

I'm working on couple of pieces at the same time and I'm applying to them old and new techniques to the images, all the while wondering how far back I can turn the clock on them....? What I love the most about altered art is a complete freedom of exploration new ideas.... after all who can say for sure what hadn't happened to the old photograph or an artifact since its creation? I can stamp an image, a sheet of paper, or a canvas with a muddy rubber boot, spill ink or paint, or brush it with steel wool.... and these are just very first ideas that come to mind. When we hold an antique in our hands we hope to hear its small whispers and tell the story of its journey.... did someone cherished it with joy, or was it thrown around or laid hidden for years as painful memento of a lost loved one? And that's an inspiration and challenge of altered artmaking - attempting to capture and express this precious patina of times past....

Below are few shots of my 'aging journey'...... I encourage you to experiment with your own imagery or find a favorite on an online clip art portal. One word of caution, when altering~aging your artwork, keep your anti-wrinkle away....

Tearing & Kneading can't be overemphasized. I also like burning the edges with a candle lighter for a more 'credible' feel. Make sure that you work with copies NOT originals, not only you can reuse them in future projects, but once the damage is done to an original..... well, that's all I have to say about that....

After attaching the pieces of images of old Sanskrit texts with soft gel, I applied a generous coat to the surface of heavy gel gloss to build up some texture to which the upcoming layers of paint glazes with adhere well. Next I used a glaze of Golden Quinacridone Nickel Azo Gold (in my opinion the best 'aging color'....EVER

Here I applied undiluted Golden Titan Buff with a palette knife to the ridges created by heavy gel and to the edges of the images a bit, too.

I used a wet paper towel to wipe completely off paint in here and there.... hey, you never know how much sun exposure this poor writing has experienced in a lifetime...?


I have a set of three wire brushes, each with different flexibility, that I bought at Hobby Lobby. I felt a 'creative obligation' to use my brushes on this piece... the original writing date back close to 5,000 years ago.... I know it wasn't nice to the paper, but my credibility is on the line here....!


Here is a special, very gently treatment of Golden Iridescent Gold (Fine) applied with a palette knife.

I should stop this post right here, because if I'd want to include all the pictures from this piece and another one I'm working on simultaneously, you'd be in need of a serious physical therapy for your palm, after all that scrolling, and scrolling, and scrolling....

You can check out my latest article on Creativity Portal titled 'Adventures In Mixed Media Textures.'

Monday, April 20, 2009

Creativity As A Spiritual Practice

I have noticed that until I had begun to treat my creative self-expression with reverence for something larger than myself flowing through me, my artistic journey had been marked by a continuous 'stop-and-go' pattern. I realized that relying on my ego, or the composite of opinions about myself, as a sole guidance for my creativity, can only lead to more painful frustrations and disappointments...

Brush stroke by a brushstroke, I hesitantly placed one foot in front of the other, and, to the biggest surprise of my life, I let IT FLOW.... I slowly realized that it's not about GETTING 'THERE' to the creative well, but that my only responsibility is NOT TO STAND IN THE WAY and, one-by-one, removing anything that may obstruct the flow from its complete unlimited expression. Then, and only then, I can be a clear channel for FearLESS creation, abandoning any regard for the end result, 'the product,' and embracing the process instead.

Here's what's finding its way through me right now. I've put an additional layer of extra heavy gel gloss onto the collage, I placed tiny buttons onto the hearts of flowers' petals, I gesso-ed over the thick layers of paint-gel mixtures, looking to a continuation (not a new beginning) of a previous wooden panel work. I want to collage a couple of pieces of hand-made paper I got @ Dick Blick with a printout of old Sanskrit texts (first preserved with Archival Varnish). Once everything's in place and the underlying texture becomes visible through the fragile layers of paper, I'll add some 'time colapse elements' ie.: gel texture-simulating layers, color glazes, and embellishments... but I don't really know what will happen until it's finished.


Friday, April 17, 2009

Finding Big Delights In Writing Into The Wet Paint...

I recently bought a new book 'Creative Paint Workshop For Mixed Media Artists' by Ann Baldwin. This book is a goldmine of ideas and techniques that keeps me praying for more hours in the day, so I could try some of them firsthand.

One technique that I begun to experiment with and can't get enough of is writing or carving letters in wet acrylic paint. I've done three little projects and I can see some improvement in my ability to control 'the writing devices' in each consecutive piece. Though the book's author presents this technique as writing directly into the wet paint, I decided to try mixing the paint with either extra heavy gel or hard molding paste and see where it'll take me... When applying gel/paste-paint mixture you can actually create a nice texture and bring out more depth of the writing. I learned that hard molding paste gives you more time to work with, where the gel begun to dry much sooner, and in this technique rushing is not recommended.

To write or make marks in the wet paint I befriended my rarely-used color shapers and I'm planning on extending my collection with some help form Dick Blick this weekend... I really love the 'angled chisel' color shaper as it allows you to add a calligraphy-type character to your letters, gently winding angles and curves set 'an original vintage' mood into your artwork.

What probably draw me the most to this particular technique is the underlying message of 'subtracting' - normally we keep on adding to our artwork more..... more colors, more elements, more texture, more layers. This experiment is very refreshing as we can begin to take away, perhaps from the excess, and curiously await what will emerge in the end....


Wednesday, April 15, 2009

Musings On Humility

American Heritage Dictionary defines HUMILITY as 'being free from pride and arrogance.'

I believe that too often we may only see one face of humility and, then, at other times, we mis-perceive humility for arrogance, particularly in our creative self-expression... let me elaborate with a couple of examples.

This afternoon I had an experience in which all my beliefs about how 'immune' I am internally to be free from getting engaged in 'jealousy games' were tested and my final score card is waaaay below the 'passing minimum.' Just as I thought that, after all the years upon years of inner work, I would be able to overcome my own temptation to chase the 'get-even band wagon'.... Well, I didn't despite the overwhelming awareness of the situation. Here I am, sitting in my humility that beacons as a reminder of lessons not yet mastered, silently showing me my own humanity... yet I try to hold on to my awareness and stay present praying for a precious hope of a future 'graduation'....

Another 'course' of humility took me most completely by surprise and here's what I've learned this morning. When it comes to exercising humility in our creative self-expression the popular message, often clothed in the garments of authority, anonymously and unanimously declares 'the level' of our creative ability, AKA 'talent.' And herein lies the hidden arrogance - since our creative gifts are NOT of our own making, but instead are bestowed upon us to be freely expressed THROUGH us, we can't 'trademark' them as our own property and attempt to control their expression. That's arrogance. In this instance 'playing small' is NOT humility.... Humility recognizes that we must let creativity flow forth BECAUSE we are ENTRUSTED with this task as something Larger than ourselves is at work. I know that it may seem a bit confusing on the surface because we're so used to believing that we're 'too small' to be a vessel for the Sacred. Perhaps a question to ask ourselves is 'who do we think we are to usurp a right to stand in the way?'

In remembrance of my own humility I've been working today on this tiny piece depicting the word 'Namaste' in English and Sanskrit. Namaste, in a general translations, means: The Divinity Within Me Honors The Divinity Within You.

Offering 20 personal development and spiritual growth programs at Higher Awareness